DXA Reporting With Dictation: 3 Problems

Introduction

Not much has changed in the dozen years since we wrote about DXA and PACs. Dictation is still a widely used tool, along side PACS, in reading bone density scans.

There are better ways to read DXA scans that minimize errors and produce better reports.

We have observed three problems with dictation that can easily be solved with a modern solution, such as BoneStation.

Errors capturing DXA data

A DXA body density scan produces quantitative data, including clinically BMD, T-score, and Z-score. DXA readers will typically dictate these values to a report along with an interpretation.

The dictation process is a source of error.  Research has found speech recognition software error rates of at least 7%.

Using modern tools, such as BoneStation, there is no need to dictate this information.  BMD data can be captured automatically from the DICOM transmission of the scan. We talk about this in this blog post.

Tedious To Dictate Elements of a Good DXA Report

There are many components to a high quality bone density report, beyond the BMD data mentioned above. The International Society of Clinical Densitometry (ISCD) defines elements of a bone density report in its recommendations.

It is tedious for many readers of BMD scans to dictate all the elements of a high quality report. Often times this information is omitted. Items such as DXA machine make and model, FRAX risk factors, change in BMD and other clinically relevant information will be lacking from reports.

Time Consuming to Perform Calculations

It can be time consuming for a DXA reader to calculate useful BMD related values, such as change in BMD with prior scan, change in BMD with baseline, and least significant change (LSC).

Automated reporting software, such as BoneStation, can easily produce reports with change in BMD and LSC. In addition, BoneStation can automatically fill in other relevant data, such as DXA machine make and model, FRAX score, FRAX, risk factors, etc.

See our video on ISCD Report Compliance and BoneStation produced reports

Conclusion

Dictation is a widely used method to produce bone density reports today. It is fraught with problems, many of which also apply to transcription and templates. More modern methods exist, that can reduce errors while simultaneously improving quality and efficiency.

Rules of Interpretation

BoneStation is a web-based reporting system for DXA based bone densitometry. In many of our blog posts we mention that BoneStation requires no transcription and no dictation. That is because BoneStation automatically generates a suggested assessment.

What is meant by that? How does it work?

BoneStation combines three inputs:

  • DXA Scan Data – The bone mineral data from the DXA scan
  • Patient Data – Information about the patient
  • Questionnaire – Online questionnaire that is built into BoneStation

The scan data, patient info, and questionnaire answers are fed into a rules engine. The engine outputs the assessment text, which is displayed to the reading physician as a suggested assessment. The reading physician can accept the assessment or alter it.

A simple set of rules may look like this, where the T-score and Z-score are the lowest values for all measured sites:

The above rules make use of information that is available from just the DXA scans (T-score and Z-score) and patient (age). One common variation on this set of rules is to incorporate the gender and menopausal status of women. The rules can be adjusted to look like this, where the menopausal status is indicated on the questionnaire.

BoneStation is very flexible. The questionnaire, rules, and (output) assessment text are all customizable. Some BoneStation customers’ rules consist of more than 50 rules when factoring in fractures (VFA) and other patient conditions.

Here are some sample questionnaires:

In our next blog post we’ll look at how fractures and VFA can be factored into the above rules.

There is No Need to Re-Enter DXA Data When Reporting

Many bone densitometry practices re-enter patient and DXA scan data when creating reports.  Accuracy is critical because interpretation is based on this data.  Key patient information includes gender, date of birth, and ethnicity.  Important bone mineral density data includes BMD, T-Scores, and Z-Scores. 

Physicians and their staff often re-enter the data manually from the DXA printout into templates.  Sometimes reports are transcribed.  Radiologists typically dictate the numbers into a report.  All of these are error prone.

This data re-entry step is completely unnecessary.  DXA machines support DICOM, which is an electronic format that contains all the patient and BMD data.  While BMD numbers are burned into the DICOM image and can be viewed.  The DICOM format also contains the BMD data within discrete fields.  Software can recognize and extract this information!  We have touched upon this point in prior postings such as these: The Evolution of Bone Density Report and Bone Density Reporting and PACS.

The benefits of bone density specific reporting software, such as BoneStation, become apparent with electronic availability of DXA data.  Software can calculate change in BMD, highlight if change is significant, calculate a FRAX score, and even suggest an interpretation. In addition, the data can be displayed on a report in a way that is desirable and visually appealing.

Computerizing the handling of DXA data not only reduces errors, but it increases efficiency, and shortens turn-around time of reports.

Reviewing DXA Scans on the Web with BoneStation

BoneStation is a web-based reporting solution which increases the productivity of bone density testing providers, including technologists, physicians, and administrators. In this article we focus on physicians who are responsible for the review and interpretation of BMD and VFA scans.  The physician will essentially do the following: select the exam to review, assess the technical quality of each scan, and  generate the report by filling in the various components (Assessment, Recommendations, Fracture Risk, etc). We describe that process in further details below.

The Review List and Initiating the Review Process

The physician starts by looking at The Review List, a list of recently performed BMD scans which need to be read.

BoneStation Review List

Review List shows scans awaiting review. (click for full size)


In this case the system shows 29 exams ready to be reviewed. Notice the drop down menus at the top.  These are particularly useful in situations where there are multiple DXA machines and multiple reviewers.  The Exam Date filters the list to show scans performed on a particular day.  The Location filters the list based on the DXA machine’s geographic location.  The list can also be sorted by Patient, Exam Date, and Referring Physician. In this Review Step 1, the physician  initiates the review process by clicking on Create Report (left button).

Selecting the relevant historical scans

Review Step 2 appears as “Select Comparison Scans”. During this step the current PA spine scan and all historical PA spine scans are displayed in summary fashion.  Prior scans that the physician does not want included can be excluded from the report by clicking the Exclude checkbox.

On Review Step 2 prior scans may be excluded.  (click for full size)

On Review Step 2 prior scans may be excluded. (click for full size)


The screen shows a summary of each prior scan, including scan date, scan mode, serial number of DXA machine, analysis date, and relevant BMD data.  If a prior scan was performed on a different DXA or using a different scan mode, the corresponding data would be highlighted in red.  This alerts the reviewer to the fact that he may want to exclude the scan.  For example:

Scan mode differs and is highlighted.


Looking back at Review Step 2, notice that “OK” appears in the Tech Quality column for the 11/10/2011 scan.  The 2011 scan has a report that was created in BoneStation and its technical quality was evaluated to be OK at the time of review.  Clicking OK pops up that report for immediate viewing.

Assessing Scan Quality

Click the Continue button to move to the next step.  On Review Step 3 one can compare the images of the current scan and the baseline.  Additional images, with scan data, may be viewed by clicking the dates in the Other Historical Scans section.

Specify scan quality

Review Step 3

On Review Step 3 the reviewer indicates the technical quality of the scan as either OK, marginal, or uninterpretable.  When one of the latter two is selected, one or more reasons must be picked in the second column.  If a scan is designated as uninterpretable, it will not be used in the final assessment. It is also during this step that a reviewer may request for a scan to be reanalyzed.  In this case the physician reviewer is prompted to send instructions to the technologist via email.  The scans are retained in BoneStation in a separate “Awaiting Reanalysis” queue.

Summarizing the Report

Clicking the Go To Next Scan button repeats this process for the remaining scans.  When the final scan is viewed, the Go To Next Scan button changes to Add Recommendations.  At this point the content of the various report sections are filled in.

Recommendations

Report sections are filled in, some automatically. (click for full size)

 The Summary screen can show a variety of optional report sections.  In the above example:

  • The Comparison To Prior Studies section gives a verbal description of change.
  • The Assessment section gives the interpretation.
  • The Current and Past Treatments section lists treatments as entered on the electronic questionnaire.  We did not discuss the questionnaire much during this article.  Note that it is available throughout the review process via the Questionnaire link.
  • Next visit is the suggested followup.
  • FRAX Results is the fracture score.  In the above example a FRAX score was not calculated because the patient is osteopenic.
  • Comments provides for general comments.

Note that there are drop down menus with many sections.  These contains macros of frequently used phrases that may be easily entered in to the report. The physician can also manually enter information into any section.

In Summary

This was a brief overview of the review process.  Many features, such as the integration into EMR systems, were not described or were only touched upon to keep the article short. If you would like to learn more, feel free to contact us.  Of course we are happy to hear from you if you have specific topics you’d like covered in future articles. Thank you.

The Evolution of Bone Density Reporting

Introduction
In this article we’ll examine bone density reporting and how it has evolved over the years.  Bone density testing is a relatively new test.  Reimbursement for bone density tests wasn’t approved until the mid 1990s.  DXA machines became the primary method used to measure bone mineral density.   Initially, there was little to aid physicians who reviewed bone density scans, as the process was largely manual.  Now there is a cloud based solution.

We’ll take a brief trip, chronologically, through the advances in bone density reporting.   Improvements in reporting will be discussed.  Quality, convenience, and cost improvements will also be noted.

We break down the evolution of bone density reporting into three stages:

  • Manual reporting makes use of pencil and paper or word processors to generate reports.
  • Desktop solutions are first generation software package produced by the DXA equipment manufacturers.
  • Cloud (web) based solutions, such as BoneStation.

Radiologists often use another method to review bone density scans.  This involves the use of PACS with  dictation or transcription.  We’ll look at this option in more detail in a future article.

Background
A bone density scan is a somewhat unusual test.  It has the qualities of both an imaging procedure and lab test.  The scan consists of an image plus numerical data, such as bone mineral density (BMD), t-score, and z-score.

The process of evaluating bone density scans is referred to as reading, reviewing or interpreting bone density scans.  Physicians are specially trained to read bone densitys scans.  A reviewing physician typically looks at both the scan image and numerical data.  It is common to compare current scans with a patient’s prior scans.  A typical report  may include the numerical scan data, an assessment (for example, osteoporosis, osteopenia, or normal), recommendations, and a statement about change in bone mineral density (BMD) – assuming the patient had prior scans.

The Evolution
Manual Reporting
In the beginning, bone density reports were created manually.  DXA machines produce printouts of scans.  A printout contains a scan image and tables of numbers, including bone mineral density (BMD), t-score, and z-score.   The data was typically re-entered into a word processor and an assessment was typed in.  The scan image was usually omitted, since it was difficult to get the scan image into the report.

The disadvantages to this method are quite obvious:

  • Data entry of the bone density quantitative data (BMD, t-score, z-score) is error prone.
  • The only way to compare a scan with prior scans is to have the printouts of the prior scans, and this involves manual labor to pull old charts.
  • Storage of paper scans and reports can be costly.
  • To calculate change in BMD, during review, is also be labor intensive.
  • It was difficult to include images in a report.

Desktop Solutions
Eventually the DXA manufacturers implemented the DICOM standard.  DXA machines could then transmit bone density scans to other computers.  Soon after, the DXA manufacturers provided desktop software applications that could communicate DICOM and receive bone density scans.  A physician could install the desktop software on his office PC and have bone density scans transmitted to it.  Using the software, he could then create a bone density report.  The report could be stored in an electronic format – a data file.

This software was an advancement and addressed issues with the manual method:

  • Quality was improved mainly due to elimination of data entry.  The software could extract the quantitative data from the DICOM transmission and place it in the report.
  • Reports could contain images.
  • Reports took an electronic form and could be stored that way.

Desktop reporting also introduced new problems.

  • Where are electronic reports stored?  Would they remain on the PC of the reading physician?  What if there are multiple reading physicians?
  • How could one recall an old report easily?  Even though reports were stored electronically, the desktop applications offer no easy way to access an old report.
  • What about privacy or security issues with storing scans (in DICOM format) and reports on a PC hard disk?
  • How are reports backed up?

The desktop software also represented an additional cost – both direct and hidden.  The main direct cost was the software itself.  The DXA manufacturers offered the software for purchase.  Hidden costs included addressing the problems described above.  Additional tools and infrastructure are need to backup electronic data, store reports on a network, organize reports (in a database) to be easily searchable, and provide security and privacy of electronic data.

The side effects of introducing desktop software vary depending on the number of bone density tests performed.  A high volume provider may have an IT department in place and the infrastructure for addressing storage, backup, and security may exist.  A low volume provider may have to hire expertise in these areas.

Cloud
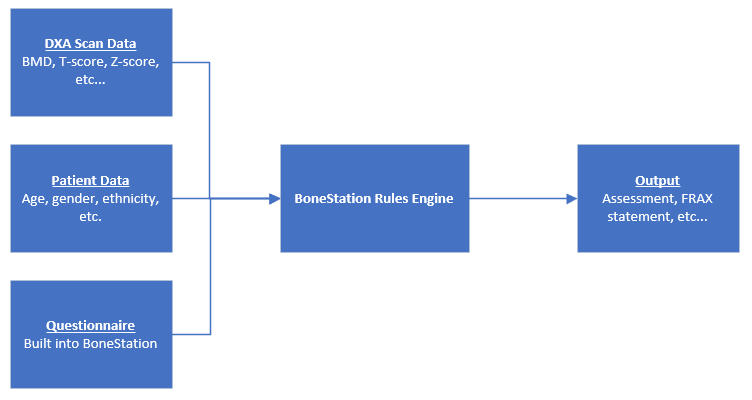
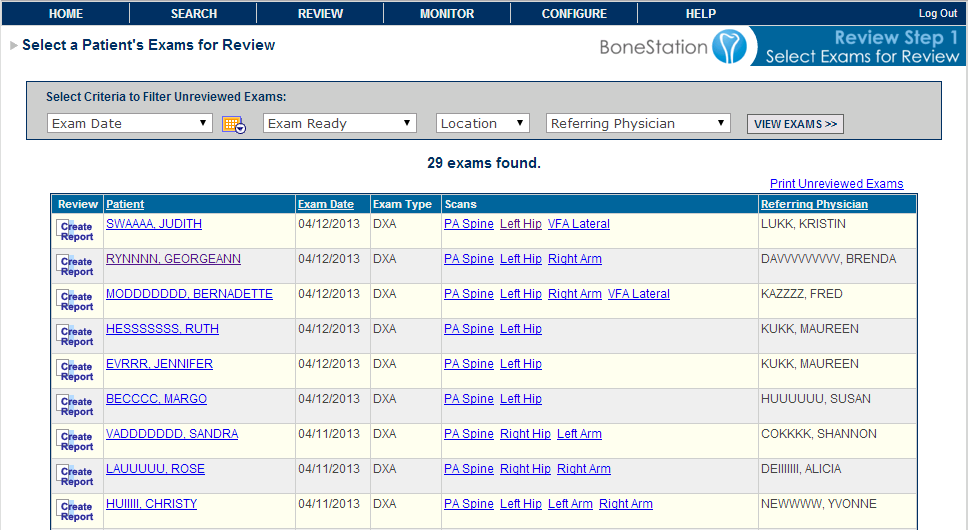
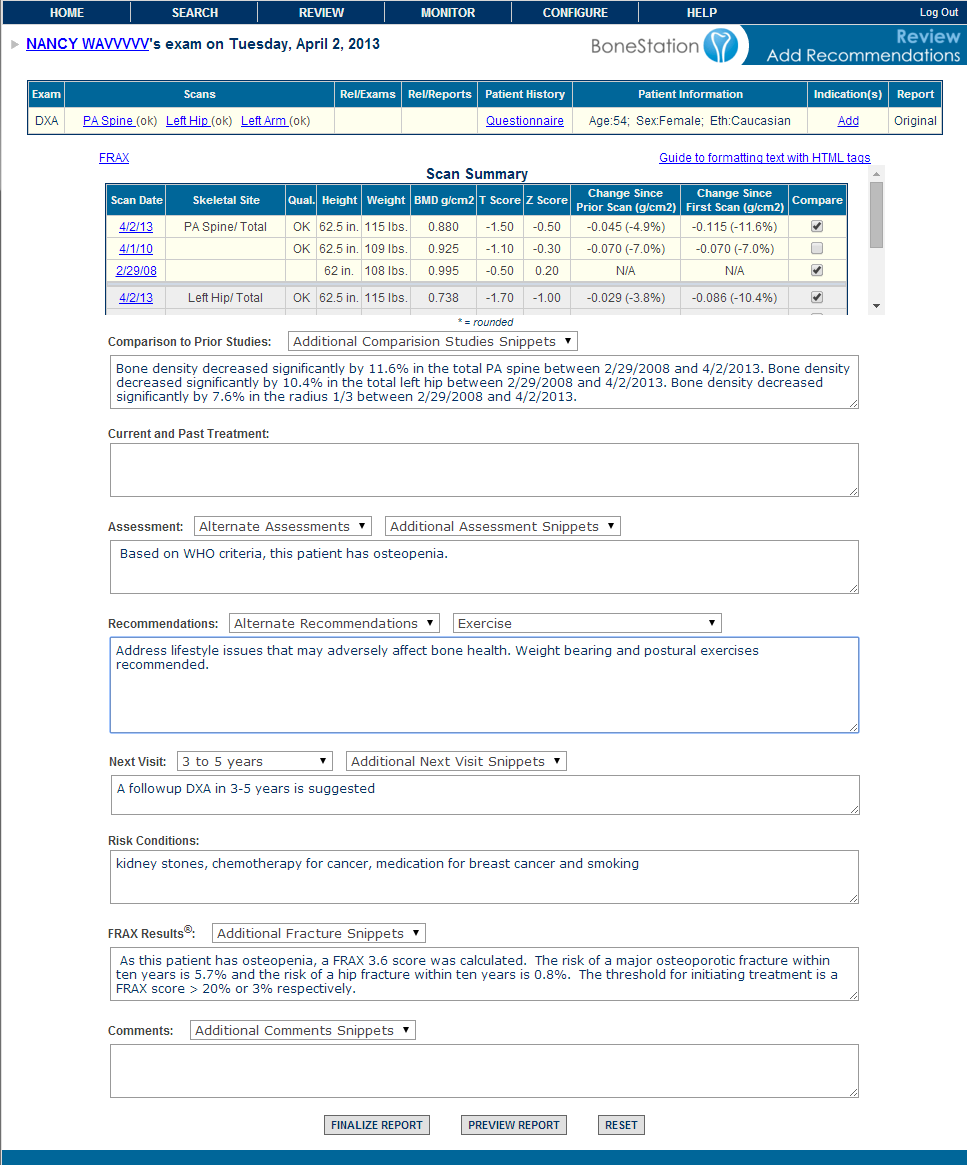
The “cloud” solution is BoneStation.  The term “cloud” is today’s common lingo for storing data out on the Internet.  Scans are transmitted, via DICOM, to BoneStation.  Reviewing physicians log into BoneStation’s web application and can view scans – images and data – and create reports.

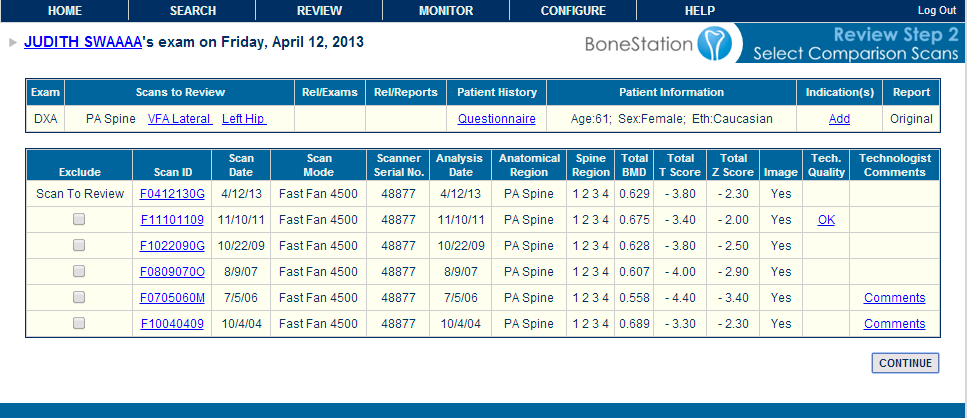
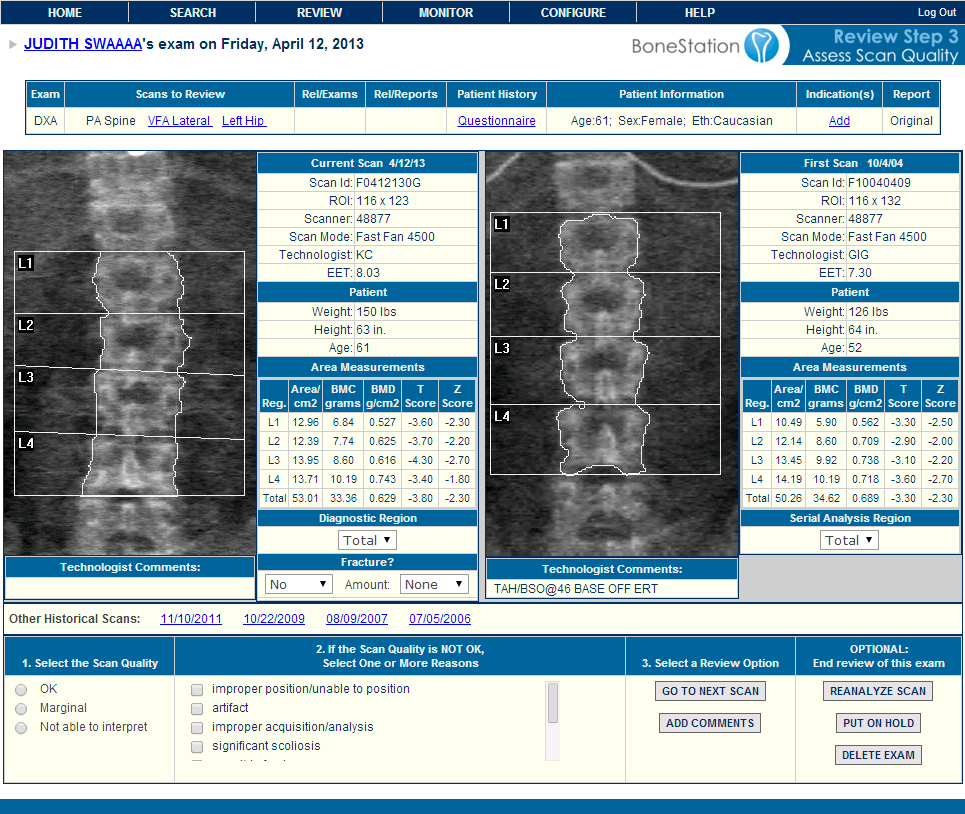
BoneStation solves the problems of the manual and desktop methods.   Scan data (BMD, t-score, z-score, etc) is automatically extracted and made available on the report.  No data entry is needed.  BoneStation also makes prior scan images and reports available during the review process, which was a shortcoming of the desktop solutions.

New problems introduced by the desktop software are also addressed.

  • Reports are stored centrally, in an enterprise class database.
  • The database is backed up, which prevents data loss.
  • An easy to use search mechanism provides the ability to easily search for and view old reports.
  • Access to BoneStation is secure.  One must be granted authorization to access BoneStation in order to see bone density data.
  • Data transmitted to and from BoneStation is encrypted, which maintains privacy.

In addition, there are additional clinical advantages:

  • Prior scan images and data are available – even during review.
  • Old medical history questionnaires are also available, which is useful with FRAX.

Cloud based solutions often solve a wider spectrum of problems while also being more cost effective.  BoneStation addresses issues of quality, security, data integrity, and privacy.  It is easy to install and use, requiring simply a web browser and internet access.

Costs are typically lower with cloud based solutions.  Startup costs are low and cloud solutions are typically offered on a per usage basis.  BoneStation is offered on a cost per report basis.  In addition, BoneStation addresses hidden IT costs, such as storage, backup, and privacy and there are no upgrade and maintenance fees.

Summary
While bone density testing is relatively new, there are modern solutions available for reporting.  The initial desktop solutions addressed quality issues related to data re-entry.  The most recent solutions are more comprehensive and address clinical, quality, and information technology problems while keeping costs low.

Additional links:

BoneStation – cloud-based bone density report for DXA.

Reading bone density scans on a mobile device with BoneStation.