Bone Density Imaging Workflow

In this post, we’ll describe medical imaging workflow as it specifically applies to DXA based bone densitometry.  Radiology departments, imaging centers, and hospitals have implemented efficient processes that maximize the volume of patients, along with revenue, and also minimize errors.

This posting assumes modern technology is in place, such as electronic medical records (EMRs), hospital information systems (HIS), radiology information systems (RIS), DICOM for electronic image transfer, and picture archiving systems (PACS).  For a reporting system, we’ll assume BoneStation is used.  We’ll also assume the EMR, HIS, or RIS provide order entry and results capabilities (where ordering providers view test results).

The following diagram depicts typical workflow, but adapted for DXA based bone densitometry.  The workflow can be thought of as an assembly line, where the patients navigate through the process.  Often times, patient flow may be tracked throughout the day via the EMR/RIS/HIS.

1) An order is placed (scheduled) for a bone density test.  Often times the ordering provider calls the bone density practice to order a test.   The order is entered into the EMR/RIS/HIS.

2) Patient arrives for the exam on the scheduled day.

The receptionist may log into the EMR/RIS/HIS and update a patient’s status to “arrived”.

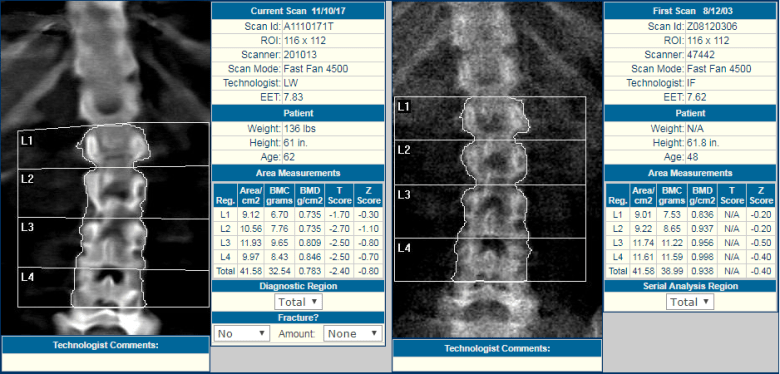
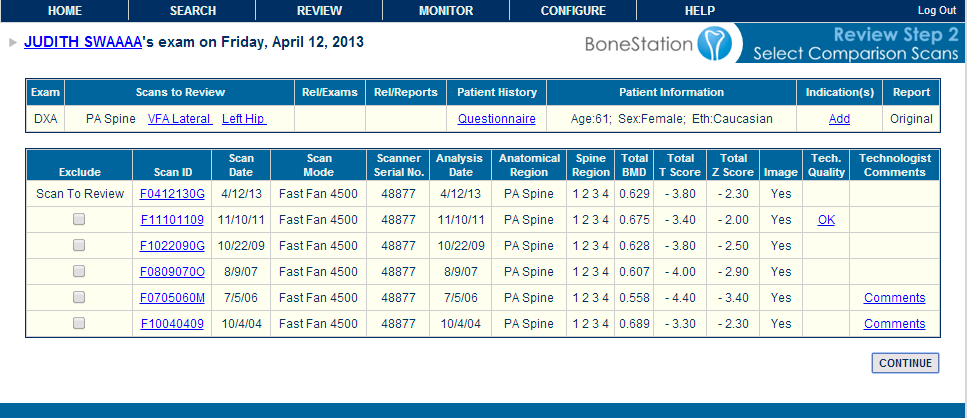
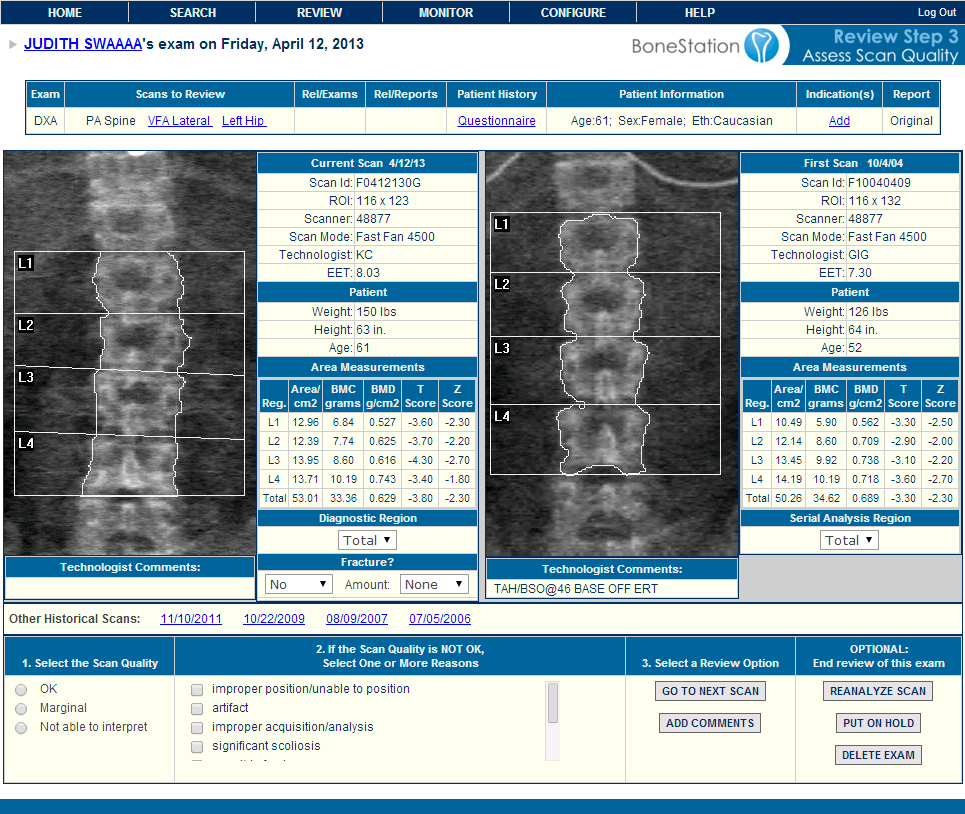
3) A DXA technologist scans the patient on the bone densitometer, analyzes the scans in the DXA software, and transmits the scans, via DICOM, to BoneStation.  BoneStation extracts all the quantitative data and the images.

If DICOM Modality Worklist (MWL) is available on the DXA, the tech may pull all the patient info (name, DOB, ethnicity, etc) electronically from the EMR/RIS/HIS into the DXA software.  Otherwise the technologist manually enters patient demographics.

The technologist logs on to BoneStation and fills in the patient history questionnaire.  FRAX is built into BoneStation, and the questionnaire is filled out there instead of in the DXA software.  There are advantages to having questionnaires in BoneStation, which are discussed here.

The technologist may update the patient’s status in the EMR to “complete”.

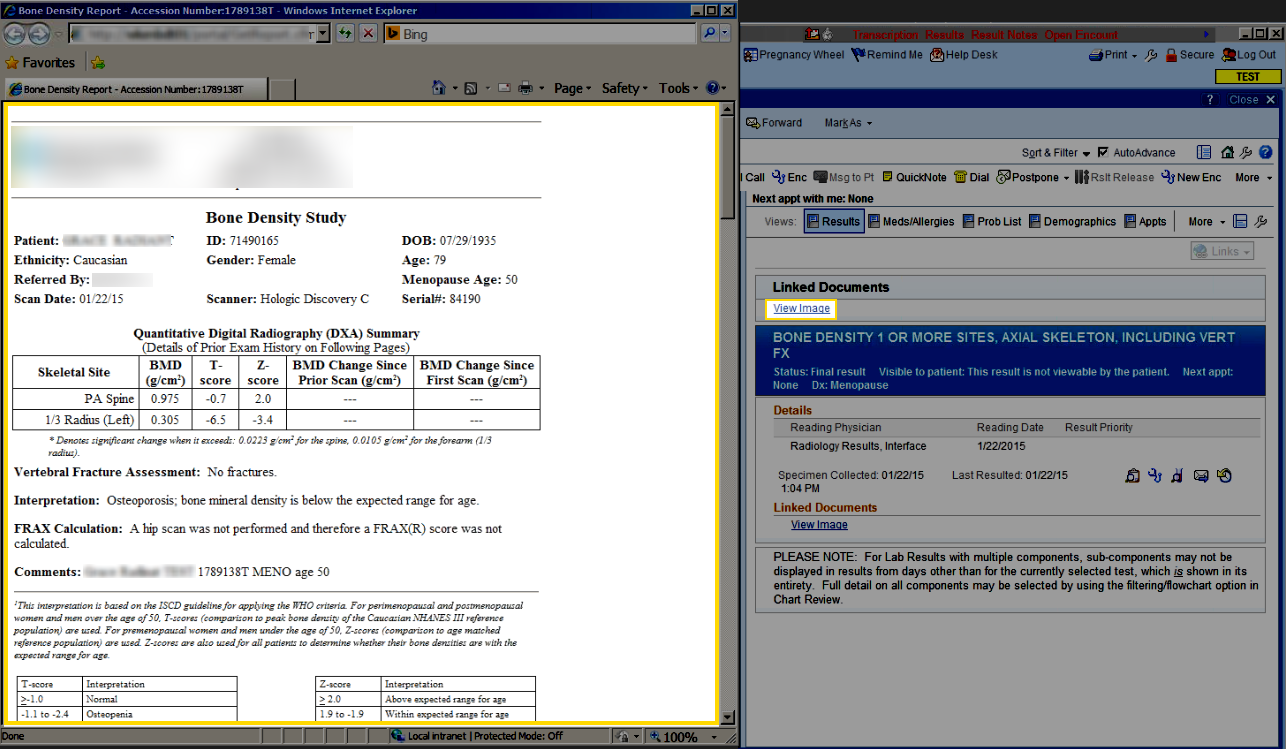
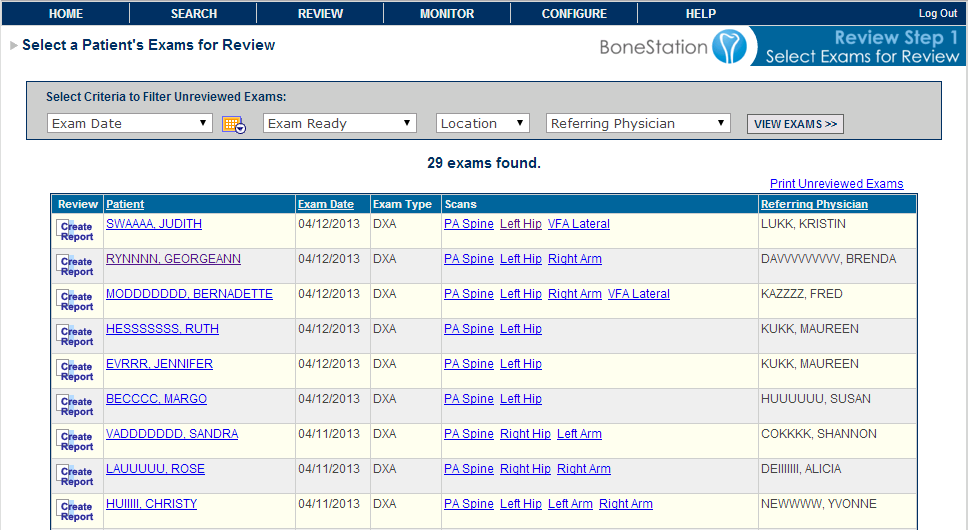
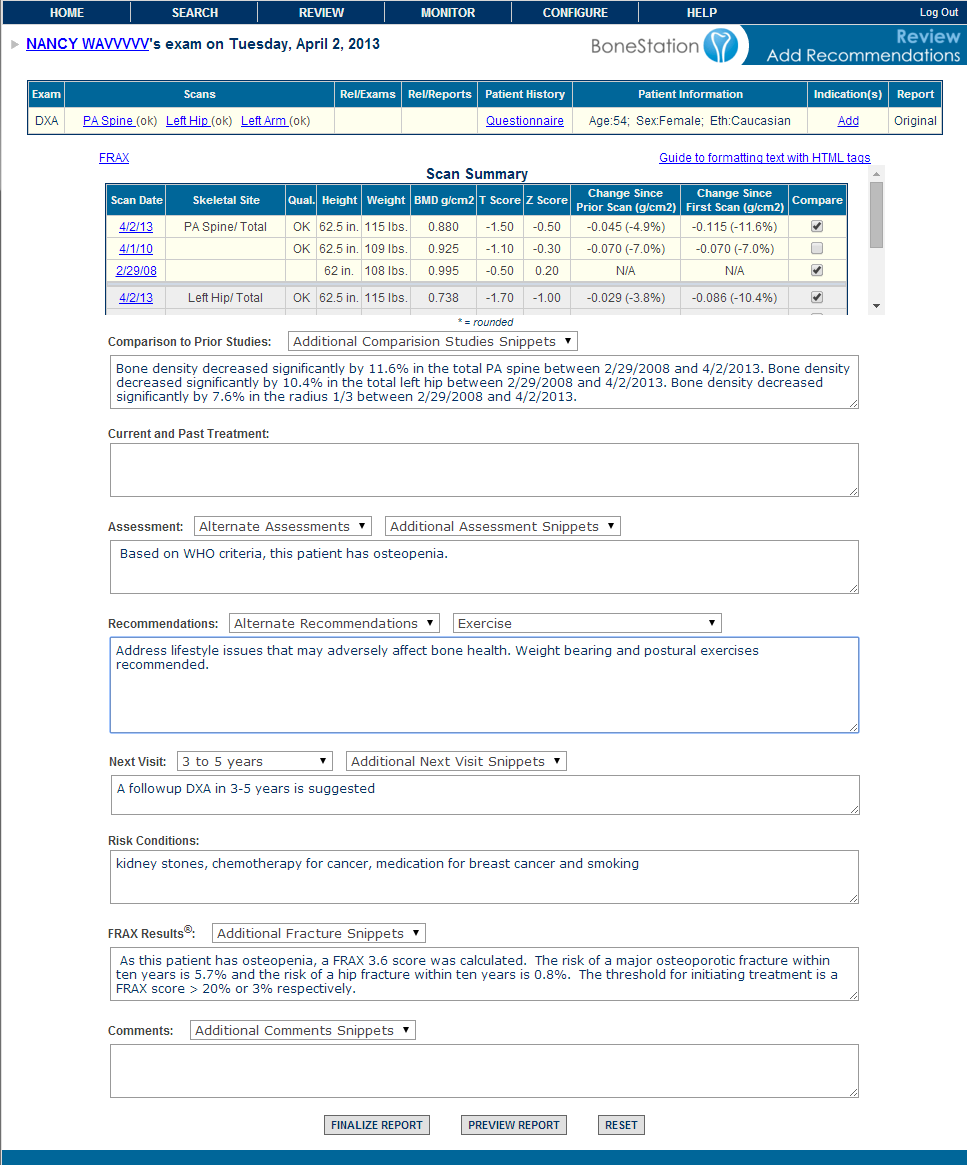
4) A physician, that is specially trained to read DXA scans, logs into BoneStation and reads the bone density scans.  BoneStation automates much of the process of reading scans.  The final output is a bone density report.  This video demonstrates how easily and quickly reading scans is in BoneStation.

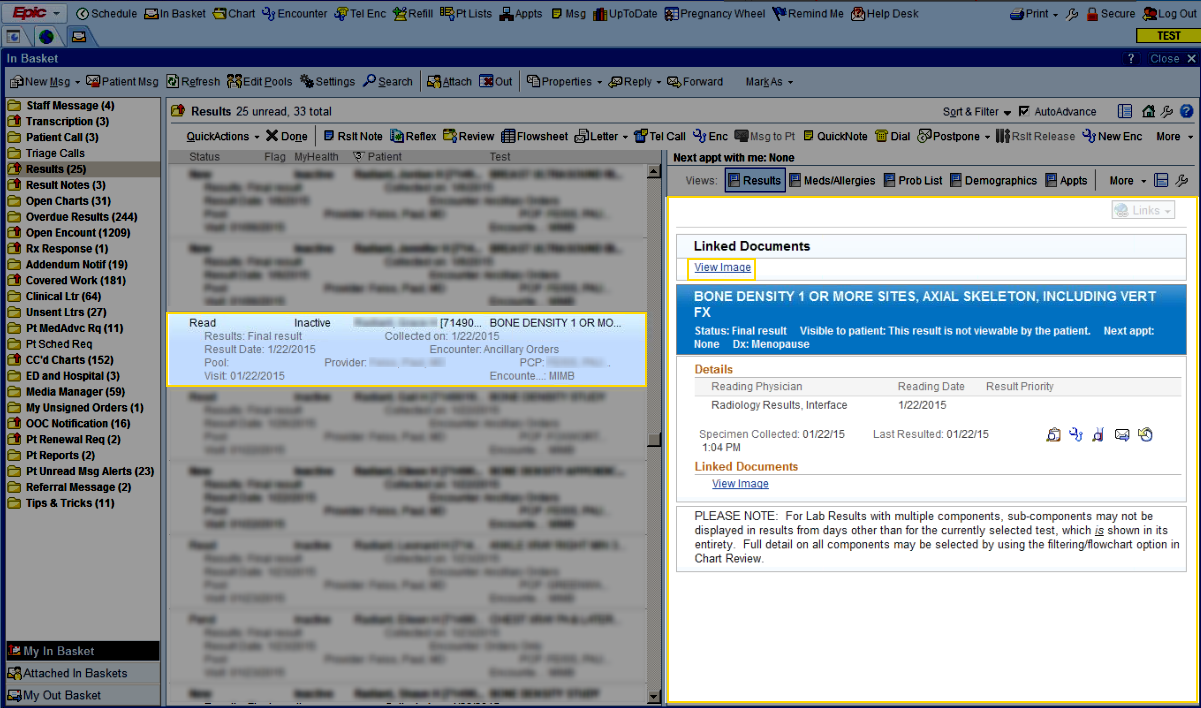
5) BoneStation distributes the report to the EMR/RIS/HIS.  BoneStation creates fully formatted reports, with tables, images, and charts.  Click here to see some sample reports.  Depending on the interface between BoneStation and the EMR, only a text report may be available or the fully formatted report in the EMR.

BoneStation supports a variety of ways to distribute reports, including printing and faxing.  This article provides more info about one instance of a BoneStation to Epic interface.

Once the EMR receives the bone density report, the patient’s status is updated to “final”.  This may also trigger events related to billing.  The process for the patient’s scan is now complete.

6) The ordering provider accesses the report in the EMR/RIS/HIS.  Some EMRs may notify the ordering provider that results have been received when the report is received by the EMR/RIS/HIS.

The workflow described here is typical for most hospitals, radiology departments and imaging centers.  There are some unique aspects that are specific to DXA. We will go into more detail regarding DXA in a future posting.

Three Keys to Quality Bone Density Reporting

This posting is the last of a 3-part series about bone density reporting and how BoneStation can make a difference compared to common practices. Part 1 focused on costs reduction and part 2 on time savings.  In this article we discuss three specific areas that BoneStation addresses in regards to quality:

  • The Report – components that comprise a good bone density report
  • Review process – facilitating a sound interpretation
  • Workflow – improving communications between staff

The Report
The International Society for Clinical Densitometry defines the minimum requirements for a bone density report.  Some items that should appear on a report include: patient demographics, BMD values for each site measured, DXA manufacturer/model, and significant change.

BoneStation automates report creation.  Manual data entry is eliminated.  BoneStation extracts all appropriate DXA data and places the data in a report.  In addition, changes in BMD and determination of significant change are automated.  A final bone density assessment is even suggested.

The Review Process
While DXA bone density scan images should not be used for diagnostic purposes, they are instrumental in determining the consistency of serial measurements.  Is the patient positioned properly?  Are the regions of interest (ROIs) consistent with prior scans?  What is the technical quality of the scans?

BoneStation’s review process is designed to highlight key aspects for interpretation.  Prior scans are easily visible. ROIs may be viewed both visually and numerically.  Technical quality of scans must be specified and may also appear on the report.

bsblogrev

Workflow
In most situations, the technologist and reading physicians are in different locations.  Scans are not typically read in real time either.  Improved communications among bone density staff can lead to increased quality.

  • BoneStation allows technologists to pass information to reading physicians via “scan comments”, which are entered on the DXA and appear in BoneStation.
    bsblogrev2
  • BoneStation may be configured to “validate” patient information for consistency.  Is data missing, is patient demographic info consistent, etc.  For example, if a female patient is 62 years old and is designated as pre-menopausal, BoneStation is able to provide a warning that this information may not be valid.
  • When a reanalysis is required, BoneStation facilitates communications between the reading physician and technologist.  The reason for reanalysis is described to the technologist.  The scan is also tracked as awaiting reanalysis – so staff will not lose track of it.
    bsblogrev3

Summary
BoneStation is designed specifically for DXA based bone densitometry.  It increases efficiency and quality simultaneously.  Much of the mundane handling of bone density scans is automated. It facilitates a review process designed for bone density, and enables easy communication among bone density staff.

BoneStation has produced more than a half million reports and has proven to be reliable solution for BMD reporting.  Customers such as Mass General Hospital, Swedish Medical Group, Emory and others enjoy higher throughput and quality at lower cost.

Speedy Bone Density Reporting with BoneStation

This posting is part 2 of a 3-part series highlighting how BoneStation can reduce costs, save time, and improve quality in BMD reporting.  In the previous blog, we emphasized the cost savings aspect. Here we focus on the time aspect, or the speed of reporting.

Bone Densitometry using DXA has been around for a while. As we all know, a particularity of BMD scans is that they output images (spine, hip, etc) as well as numerical values (BMD, BMC, T-score, Z-score, etc…).

In today’s digital world, still many practices waste precious time in error-prone manual steps when reviewing DXA studies. These steps include: writing down numbers on paper, calculating BMD changes with calculator, retrieving historical scans from PACS, using post-its to ask technologists for reanalysis of a scan, using dictation, using the FRAX website, etc…

BoneStation resolves these issues, thereby offering the opportunity to save time at several points of the workflow:

  • Data (BMD, T-score, etc..) is extracted directly and instantaneously from the DXA scans
  • No need for human reading, dictation or transcription
  • Current and prior scans (images and numbers) show up side by side allowing for instantaneous comparisons
    • no need to pull charts, or to retrieve historical images and data on PACS
  • BMD changes are computed instantaneously and show up in the report
  • BMD changes are instantaneously compared to the stored least significant changes
  • FRAX is calculated automatically according to ISCD recommendations
  • Request for reanalysis is built in BoneStation for quick and traceable communication with the technologist

Even today we occasionally observe situations where readers do not compare scans with priors and do not calculate changes in BMD.  The International Society of Clinical Densitometry (ISCD) recommends these as important elements of a bone density report.  Perhaps it takes too long to provide this information in a report.  However, BoneStation makes it easy.

This BoneStation video illustrates how quickly a reading physician can review a spine and hip DXA study, including FRAX.  An actual review, with prior scans, can often take under one minute with BoneStation.  With the narrative in the accompanying video, it takes about a minute and half to review a spine/hip.

We hope that this brief blog helps you think through your bone densitometry process. 

Sylvie Bokshorn

BoneStation has produced more than a quarter million reports and has proven to be reliable solution for BMD reporting.  Customers such as MGH, Swedish Medical Group, Emory and others enjoy higher throughput and quality at lower cost.

How a Large Hospital Reduced the COST of Bone Density Reports by 60%

This posting is part 1 of a 3-part series describing BoneStation and how it can ease the burden by reducing costs, saving time, and improving reporting quality.  Here we focus on cost reduction, while keeping in mind that time, money and quality are connected.

Of course, cost savings will depend on your practice. In this blog, we bring your attention to the case study done by Dr. Rosen at Beth Israel Deaconess Medical Center, where the cost per report were reduced by 60%.

Bone Densitometry practices operate under increasing pressure to perform with less. Challenges abound, including overloaded staff, complex workflows, reporting errors, and of course low DXA reimbursement.

Performing precise and accurate DXA measurements takes effort.  DXA machines are sensitive devices requiring correct calibration and patient positioning. Capturing patient history properly and providing consistently quality reports demand much energy and focus. Let’s not forget that DXA stands out as an imaging modality (compared to regular X-Ray, MRI, or Ultrasound) because the output consists of images and numerical values.

The cost savings, in the case of Dr. Rosen, came from:

  • Reduced labor cost:
    • no need to pull charts because BoneStation provides all prior scans during review.  Both the prior scan images and numbers are available.
    • no need to dictate and transcribe
  • Cost savings due to space savings – Paper storage of charts no longer needed because all scans (images & date) are stored electronically in BoneStation.  
  • Cost savings in materials, such as ink and paper, because no need to print reports.  Reading physicians have access to all scans (image & data) in BoneStation.
  • Time is money: reading physicians interpret scans faster because current and prior scans show up side by side during review (no extra step or click needed).
  • Subtle yet important costs are those associated with errors in reporting numerical values such as the T-scores. Such costs can impact the entire hospital. BoneStation eliminates such errors since the values are directly extracted from the DXA software.

Even though we focused on the economic aspect, we must highlight a powerful triple outcome resulting from the ability in BoneStation to observe prior scans and current scans side by side: it not only saves money, and time, but also increases quality. The fact is that still today, many readers do not take the time to check prior scan images and numbers, even though this is important in order to check for consistent patient positioning and analysis.

We hope this short blog helps you as you assess or reassess your current bone densitometry process. We invite you to learn more by clicking here: case study by Dr. Harold Rosen of BIDMC.

Sylvie Bokshorn

BoneStation has produced more than a quarter million reports and has proven to be reliable solution for BMD reporting.  Customers such as MGH, Swedish Medical Group, Emory and others enjoy higher throughput at lower costs.

Bone Density Report Distribution: the last mile

The physician has interpreted the bone mineral density (BMD) test and generated the report.  Now what?

Obviously it needs to be sent or “distributed” to the interested parties.  In this article we look at this distribution phase, which is sort of the “last mile” in the reporting process.

So what happens to the BMD report once it has been created? Having worked with a variety of hospitals, we know that… it depends! There is no standard answer to that question because it depends on several key factors including:

  • Who will be the final “consumers” of the report?
  • Does the facility have an Electronic Medical Records system (EMR)?  Who has access to the EMR?

Let’s dive a little more into these questions.

The final consumer of the report is typically the ordering physician i.e. the physician who prescribed a bone mineral density test for his/her patient. Usually it is the primary care physician, although other doctors treating the patient may also need to see the report.

Today, most healthcare providers have a functional EMR in place.  It is generally accessible to all physicians, and usually the appropriate place to store bone density reports. (There may be a radiology information system (RIS) and/or a PACS in place too;  often though these systems are available only to radiologists.)

The EMR, however, may not be available to all physicians who need to access test results.  If the ordering doctor is located in the hospital where the BMD test occurs, he/she is then connected to the EMR. But the ordering doctor could be external to that hospital or even located in a remote office with limited access to the EMR.

What is then the best way to distribute exam results, such as bone density reports?

BoneStation offers the flexibility required to handle most situations as explained below. There are three methods available to distribute reports:

  1. Printing – which typically means the report is sent via mail to the consumer
  2. Faxing
  3. Transmission to an EMR –  through a digital interface (typically an HL7 interface)

In addition, BoneStation allows the distribution method to vary for each primary care physician (ie. the consumer).  A couple examples:

  • A physician with access to the EMR may simply receive reports via the EMR
  • A physician with access to the EMR may receive reports via the EMR, fax, and a printed report via mail
  • Physicians with access to the EMR may receive reports via EMR and physicians without access to the EMR may receive faxes

As mentioned above, other doctors than the ordering physician may need to receive the patient’s report.  This is very easy to set up with BoneStation thanks to its distribution list functionality.

For the sake of traceability, the complete history of each report, recipient, distribution method, and distribution date/time is stored in BoneStation. The hospital staff can quickly and easily review that historical data.

BoneStation offers the necessary flexibility for distributing BMD reports.  It support traditional methods, such as print/mail and fax, which are still needed today, in addition to the modern solution of interfacing to Electronic Medical Records systems.

In today’s fragmented healthcare landscape it is important for vendors to offer flexible solutions to accommodate different situations, not only within the medical office or hospital, but also at the interfaces between stakeholders. We have learnt that even in the very specific case of the distribution of BMD reports, there can be many scenarios that need to be resolved, and we will continue to address the constantly evolving landscape.

BoneStation and Epic: The first interface

BoneStation’s first Epic integration occurred recently at a major Massachusetts medical center.  This center has six DXA bone density screening locations which report BMD studies. Bone density tests are read via BoneStation, a browser based application with centralized database, and reports are made available to clinicians via Epic.

The main goals of the integration were to:

  • Increase turn-around time of reports for the clinicians
  • Provide fully formatted reports with tables, images, and graphs
  • Have clinicians notified automatically when reports become available

Before integration, the reports, after being reviewed in BoneStation, needed to be printed and scanned into Epic.  This process greatly delayed the availability of bone density reports.

After integration, bone density reports are available in Epic within seconds of being read.

BoneStation provides richly formatted reports with tables, images, and graphs.  It was desirable to have these available to referring physicians.  The BoneStation Portal, which works in conjunction with the HL7 interface, provides fully formatted reports in Epic.epic with bd report - annotated - blog

Clinicians are also notified when a bone density result arrives for one of their patients.  The HL7 interface triggers this mechanism when a bone density report is finalized in BoneStation and transmitted to Epic.  Clinicians are then notified via their “In Basket”.epic inbox - annotated - blog


The first BoneStation interface to Epic was successful in accomplishing the medical center’s three major objectives, thereby increasing both the effectiveness and efficiency of their bone density testing practices.

BoneStation: a summary of advantages

We have been asked recently to present a summary of advantages that BoneStation provides to users. In this blog we first list what we believe are the key advantages our reporting solution brings compared to traditional methods. We then refer the reader to the results of a mini survey we sent to our current power users.

Differences and advantages that we believe BoneStation brings versus traditional reviewing, interpreting, and reporting methods for Bone Density Testing:

  • faster review
  • possibility to view current scan (image & data) and prior scan simultaneously
  • no data errors (no manual entry, no paper, no dictation)
  • possibility to review scans from anywhere (with web access)
  • more efficient workflow
  • faster overall turn-around
  • more efficient storage of the reports (patient exam, and questionnaire and report stored electronically and linked to each other)
  • possibility to interface to EMR
  • ability to do queries (data is structured in database)
  • better-looking reports
  • calculations of BMD changes and FRAX according to ISCD recommendations
  • possibility to scale up & standardize across several DXA machines (because use of centralized database)
  • possibility to customize your patient questionnaire.

We sent out a subset of ten of these points to our current power users (mostly physicians, and a few technologists) and ask them to pick the 3 most important benefits to their practice.

The results are: 1. the availability of prior scan images during review. 2. the possibility to review exams from anywhere. 3. better workflow compared

You can find the full ranking here:  BoneStation Survey


Reviewing DXA Scans on the Web with BoneStation

BoneStation is a web-based reporting solution which increases the productivity of bone density testing providers, including technologists, physicians, and administrators. In this article we focus on physicians who are responsible for the review and interpretation of BMD and VFA scans.  The physician will essentially do the following: select the exam to review, assess the technical quality of each scan, and  generate the report by filling in the various components (Assessment, Recommendations, Fracture Risk, etc). We describe that process in further details below.

The Review List and Initiating the Review Process

The physician starts by looking at The Review List, a list of recently performed BMD scans which need to be read.

BoneStation Review List

Review List shows scans awaiting review. (click for full size)


In this case the system shows 29 exams ready to be reviewed. Notice the drop down menus at the top.  These are particularly useful in situations where there are multiple DXA machines and multiple reviewers.  The Exam Date filters the list to show scans performed on a particular day.  The Location filters the list based on the DXA machine’s geographic location.  The list can also be sorted by Patient, Exam Date, and Referring Physician. In this Review Step 1, the physician  initiates the review process by clicking on Create Report (left button).

Selecting the relevant historical scans

Review Step 2 appears as “Select Comparison Scans”. During this step the current PA spine scan and all historical PA spine scans are displayed in summary fashion.  Prior scans that the physician does not want included can be excluded from the report by clicking the Exclude checkbox.

On Review Step 2 prior scans may be excluded.  (click for full size)

On Review Step 2 prior scans may be excluded. (click for full size)


The screen shows a summary of each prior scan, including scan date, scan mode, serial number of DXA machine, analysis date, and relevant BMD data.  If a prior scan was performed on a different DXA or using a different scan mode, the corresponding data would be highlighted in red.  This alerts the reviewer to the fact that he may want to exclude the scan.  For example:

Scan mode differs and is highlighted.


Looking back at Review Step 2, notice that “OK” appears in the Tech Quality column for the 11/10/2011 scan.  The 2011 scan has a report that was created in BoneStation and its technical quality was evaluated to be OK at the time of review.  Clicking OK pops up that report for immediate viewing.

Assessing Scan Quality

Click the Continue button to move to the next step.  On Review Step 3 one can compare the images of the current scan and the baseline.  Additional images, with scan data, may be viewed by clicking the dates in the Other Historical Scans section.

Specify scan quality

Review Step 3

On Review Step 3 the reviewer indicates the technical quality of the scan as either OK, marginal, or uninterpretable.  When one of the latter two is selected, one or more reasons must be picked in the second column.  If a scan is designated as uninterpretable, it will not be used in the final assessment. It is also during this step that a reviewer may request for a scan to be reanalyzed.  In this case the physician reviewer is prompted to send instructions to the technologist via email.  The scans are retained in BoneStation in a separate “Awaiting Reanalysis” queue.

Summarizing the Report

Clicking the Go To Next Scan button repeats this process for the remaining scans.  When the final scan is viewed, the Go To Next Scan button changes to Add Recommendations.  At this point the content of the various report sections are filled in.

Recommendations

Report sections are filled in, some automatically. (click for full size)

 The Summary screen can show a variety of optional report sections.  In the above example:

  • The Comparison To Prior Studies section gives a verbal description of change.
  • The Assessment section gives the interpretation.
  • The Current and Past Treatments section lists treatments as entered on the electronic questionnaire.  We did not discuss the questionnaire much during this article.  Note that it is available throughout the review process via the Questionnaire link.
  • Next visit is the suggested followup.
  • FRAX Results is the fracture score.  In the above example a FRAX score was not calculated because the patient is osteopenic.
  • Comments provides for general comments.

Note that there are drop down menus with many sections.  These contains macros of frequently used phrases that may be easily entered in to the report. The physician can also manually enter information into any section.

In Summary

This was a brief overview of the review process.  Many features, such as the integration into EMR systems, were not described or were only touched upon to keep the article short. If you would like to learn more, feel free to contact us.  Of course we are happy to hear from you if you have specific topics you’d like covered in future articles. Thank you.

Meaningful Use and DXA Bone Densitometry

The government’s efforts to coerce healthcare providers to meaningfully use electronic health records is in full swing.  Stage 1 of Meaningful Use (MU) focuses on electronic collection of data. Financial incentives have been provided for early adopters. Starting in 2015 penalties will be imposed for CMS related services, starting at 1% in 2015 and increasing by 1% each year up to 5%.  Stage 2 addresses increasing quality, health information exchange, and patient engagement. Stage 3  targeted now for 2017 focuses on improving patient outcomes and population health.

What does Meaningful Use mean for DXA providers?

To participate in Meaningful Use a hospital or provider must comply with mandatory (Core) and elective (Menu) measures.  Many measures define a degree of compliance.  For example, 30% of all orders must be made via computerized provider order entry (CPOE).  There is some flexibility in how compliance may be calculated.  One key aspect for DXA providers is the classification of a patient encounter as “seen by” or an “office visit”.  Patients “seen by” a physician may be excluded from measurements.

DXA providers may be considered specialists and thus be excluded from many aspects of meaningful use (see the Meaningful Use For Specialists Tip Sheet).  If each patient receives a consult, then each visit would likely be counted under meaningful use (an an “office visit”).  If a provider simply scans patients and returns a report to a referring physician, these could be categorized as “outpatient” (or “seen by”) encounters and be excluded.

We have seen flexibility in how MU is calculated and, in particular, which patients are counted. In one case, a radiologist performed thousands of readings in a year with only a handful of consults.  In this case, the radiologist claimed exclusion because so few office visits were performed.  We have also seen cases where an organization decided to include readings.

DXA providers must ask themselves if they want to comply with the letter of the law or truly buy into the spirit of meaningful use.  Of course there are other factors to consider such as one’s ability (financial, technical, logistical) to comply.

It may be difficult to avoid meaningful use, even as a specialist.  Under Stage 1, 10% of all tests results must be provided to patients and this increases to 50% under Stage 2.  DXA providers may be required to supply test results electronically as part of their hospital’s MU compliance.  At the moment it is unclear as to whether images must be provided.

Another MU aspect which may be difficult to avoid is the collection of relevant patient demographics and history.  For example, under Stage 1 patients’ ethnicity, height and weight must be collected as well as their smoking status.  Many specialists may claim exclusion because these items are not relevant for their services.  However, these items are necessary for DXA.

It may be relatively easy for some DXA providers to comply with MU.  If your organization provides an EHR, you may be able to piggyback on them.

MU may also provide benefits for DXA.  For example, a DXA operator doesn’t have to perform data collection if the data was already entered in the EHR (by another department for instance).  There may be future benefits when the EHR can transfer appropriate data to the DXA machine – saving time by eliminating the technologist’s need to perform data re-entry.   This is a perfect example of the spirit of meaningful use in action.

In this short article, we only touched the tip of the iceberg in terms of meaningful use for DXA.  We hope to address related issues in future postings.

Helpful Links:
Stage 1 Core and Menu Measures
State 2 Core and Menu Measures

Workflow for Bone Density Practices

This posting is the second in a series that discusses cloud based computing and benefits to bone density providers.  For a brief description of The Cloud and cloud based computing, see our earlier posting.

In this article we’ll focus on workflow.  A typical bone density department has several participants involved in processing bone density scans.

  • Technologist – interacts with patient and performs scan and analysis
  • Reviewing Physician – interprets scans and creates report
  • Scheduler – in a multi-DXA center, may need to schedule patient on same DXA as prior exam
  • Office Staff – distributes and/or prints reports

A cloud-based system can make an entire team function more efficiently and smoothly.  Each participant interacts at a different phase in the scanning and reporting process and can be prompted to perform their part of the work at the appropriate time.

Here is a screenshot of the workflow process in BoneStation.  The first column is the patient; second column shows the scans, and the third column is the exam status.  Of course, the tasks can be sorted and filtered by the status.

This screen shot demonstrates work to be done and where each exam is in the process.  Each participant can then focus on their tasks in moving the exam through the process.

  • A technologist will be interested in Exam Pending, which means that BoneStation is awaiting for a scan(s) – in this case a hip scan.  When the hip scan arrives the exam goes to Exam Ready.
  • Exam Ready indicates the exam is ready to be reviewed.
  • Being Reanalyzed means the reviewing physician has requested a reanalysis.
  • Reviewed means a report has been created and it needs to be distributed and/or printed.

Cloud based software lends itself to making teams more productive.    Multiple users have access to the same information and processes.  This is difficult to achieve with desktop software, which typically isolates users from each other.